First of all, what is a ring
roller? It
is a device with 3 rollers. You roll a strip of metal between the
rollers, and it curves the metal:

My design works by using wrenches to turn the bolts. In practice,
it worked fine to turn only the bolt on the "middle" (rightmost) roller.
Why build one and not just buy one? Harbor freight sells a small ring roller for about $50. It was too small for the jobs I wanted. The next size up I could find was about $800. My ring roller cost about $50 of materials. Also, the ring roller was a great project for a beginner like me to practice my metal cutting, machining, and welding skills.
Being a beginner, I bought a large steel plate and cut my pieces from it. From this I learned it is much easier to buy metal as close to the finish size as you can! If I were to do another ring roller I would buy 1/4 inch by 6 inch wide pieces, and design it to use the 6 inch wide pieces. Also, I am a beginning welder, so don't assume I mean for the pictured welds to be Space Shuttle quality!
The main plates:


Left Picture: The long middle slot allows the center roller to move up and down. The two holes below it are for the side axles. The bottom 2 holes were just to affix the plate to the mill to machine the slot and holes. 2 of these plates were made.
Middle picture: Another side plate. The half circles in the ends allow the ring roller to be bolted to a table top. 2 of these plates were made.
Right picture: The bottom plate. The big hole in the bottom is for the main bolt, and the half circles to allow the ring roller to be bolted to a table top. 1 of these plates were made.
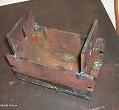
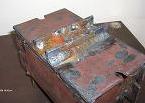
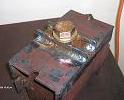
These plates were welded together into a box:


Why build one and not just buy one? Harbor freight sells a small ring roller for about $50. It was too small for the jobs I wanted. The next size up I could find was about $800. My ring roller cost about $50 of materials. Also, the ring roller was a great project for a beginner like me to practice my metal cutting, machining, and welding skills.
Being a beginner, I bought a large steel plate and cut my pieces from it. From this I learned it is much easier to buy metal as close to the finish size as you can! If I were to do another ring roller I would buy 1/4 inch by 6 inch wide pieces, and design it to use the 6 inch wide pieces. Also, I am a beginning welder, so don't assume I mean for the pictured welds to be Space Shuttle quality!
The main plates:
Left Picture: The long middle slot allows the center roller to move up and down. The two holes below it are for the side axles. The bottom 2 holes were just to affix the plate to the mill to machine the slot and holes. 2 of these plates were made.
Middle picture: Another side plate. The half circles in the ends allow the ring roller to be bolted to a table top. 2 of these plates were made.
Right picture: The bottom plate. The big hole in the bottom is for the main bolt, and the half circles to allow the ring roller to be bolted to a table top. 1 of these plates were made.
These plates were welded together into a box: